


thirdstone
-
Posts
288 -
Joined
-
Last visited
Content Type
Profiles
News and Information
Tutorials
Product Reviews
Supplier Listings
Articles
Guitar Of The Month
Links and Resources
Forums
Gallery
Downloads
Posts posted by thirdstone
-
-
Guys help me out here ,I am planing on mounting a wrap around bridge on my LP Jr inspired project
The bridge bridge link
Is not covered in the stewmac fret calc.
Anyone used one before??
-
Very nice , can you tell me what the freight costs to Sydney NSW 2035 Australia for one length and two lengths. Do you have flamed maple neck blanks as well ?? I got to ck customs for import of raw wood in case they have to fumigate it or some thing like that. thanks ...Kev
-
Yeah I am still thinking about the waist cut out but I proberbley will go without. Something about suffering for your art comes to mind. The most uncomfortable guitar I have played is a telecaster (except from a V) yet this is the guitar that you always see in a studio shot of some legend Gibbo player or a modern metal player. It must be something about being uncomfortable putting you in a different zone.

-
A little bit more work done .The headstock was grain filler and sanded. Then a light stain.
I rounded the edges of the body with a 5mm bit. I resisted making a waist cutout ala strat as its not realy in the sprit of a LP Jr. it would have been more comfortable to play though.
http://i52.photobucket.com/albums/g32/Thir...dgesrounded.jpg
Next is to play more guitar. Too much time has been spent in the shed...
-
I have finished the fret job. it went well but I must admit I take my time. I do 3 to 4 frets at a time ,let them set for 30min then do some more. I still have to dress them but i have found that the more prep workyou put into the fert board the less dressing you have to do.
So for those that are about to do their first fret job ; Make sure that the fretboard is radiused evenly and that the radius goes evenly to the edge. No rounding.Clean the slots out and make sure thy are deep enough for the fret tang.
I put a very small amount of wood glue on the tang.
http://i52.photobucket.com/albums/g32/Thir.../glueonfret.jpg
Then I press in the fret. I have made a fret press similar to the stew mac design. You can tap them in with a soft hamer no problem, tap from the ends towards the center.Dont flat spot the crown of the fret by hitting them realy hard. If they dont seat by a firm tap then the slot depth is too shellow.
My press in action
http://i52.photobucket.com/albums/g32/Thir...0/fretpress.jpg
http://i52.photobucket.com/albums/g32/Thir.../glueonfret.jpg
After doing a few frets I seat them under pressure in the vice using the radius block.You don't need to do this but I am in no hurry.
http://i52.photobucket.com/albums/g32/Thir.../neckinvice.jpg
half way
http://i52.photobucket.com/albums/g32/Thir...ginprogress.jpg
Finished Oh yeah check out the indispensible fret end trimer from stew mac. Its to trim the tang off the fret end for the binding.I have done the triming with a file and snips but this makes it much quicker and does a better job.

Fret ends trimed
http://i52.photobucket.com/albums/g32/Thir...jobcomplete.jpg
So now I will be grain filling the neck wood and working out what to do with the headplate.
Cheers
-
Got the top in today
Now I can finally get some real work done on this sucker!
Looking Good Algee I'll be tracking this one.
-
Nice going , keep up the posts. I always wondered about Jarrah as a fret board. My only concern was that Jarrah is quite an oily wood and as such I thought it would be hard to find a dry piece that had not split as It tends to do when it ages. It should feel good anyway.
How heavy is the silky oak body?
azz , Blackwood is fantastic as a feature top check out my blackwood topped LP Jr guitar under construction.
QLD maple is not that great, Its useable but its quite soft, more like a cheep mahogany. I built a little solid body electric out of it for my kids. Its not that resonant.
Never heard of gidgee!
Another blackwood project this time a lap steel
-
Just got a big batch of it and started cutting it up, plenty more to come.
http://stores.ebay.com/Sound-At-11?refid=store
I've got several hundred board feet of Black Limba and White Limba, much of it in neck sizes and much of that quartersawn. I've got plenty of blocks and strips left over if you need odd-sized pieces, just let me know.
I've still got plenty of Black Walnut, Purpleheart, Ash, Maple, Honduran Mahogany, and African Mahogany lumber left, whatever size you need or request you have, contact me and I'll see what I can do.
Hi there Just wondering have you ever sent wood to Australia??
Kev
-
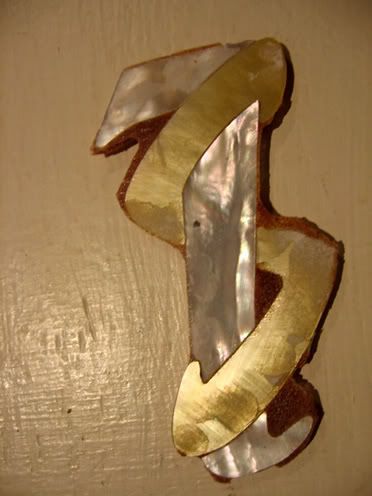
I think it was collarteral damage, you and I both know that epoxy can get messy.
I think you guys are viewing the pic in the post that is of the inlay sitting on the bench. All the epoxy on the outside got scrapped off . Its no big deal. The reason for the sawdust in the epoxy is to colour it so any non perfect joins have the wood coloured epoxy in them. Also verhoevenc you are correct about the bit in the middle.
look at the pics of the inlay insitu.
Kev
-
[Hi Mike How thick is a head plate?I take it you mean that the machine head nuts are countersunk into the headplate. I don't think that look is that good but thanks for the thought.
I have already fitted a 2mm blackwood venir to match the guitar top so its too late to change in anycase.
I had thought of a black ebony venir as the inlays realy jump out at you and the inlay work is much easier to do as the filler is undetectable. In the end I went for the matching wood. I hope to do the stain with dark then sand back trick to make the most of the grain in the venir.
What I need to ensure is that the total thickness of the headstock is 15mm Max . Anything thicker and I will have problems getting the collers on the machine heads to screw down.
I took a pic of the neck pocket
http://i52.photobucket.com/albums/g32/Thir.../neckpocket.jpg
It went okay, there is a little tare out where the pickup selector wiring channel comes out. It won’t be a problem though.
The body trimmed to the template
http://i52.photobucket.com/albums/g32/Thir...blanktrimed.jpg
the inlay pocket cut out with the inlay next to it
http://i52.photobucket.com/albums/g32/Thir...exttocutout.jpg
The inlay glued in with 5min epoxy.
http://i52.photobucket.com/albums/g32/Thir...aftergluing.jpg
and now after sanding back I grainfilled the venir , also shown is the added filler around a bit of the inlay. It was just a tiny bit and what I do is squirt a bit of superglue in and dab on some fine sawdust. When sanded back you wont see it.
http://i52.photobucket.com/albums/g32/Thir...grainfiller.jpg
next is to read up on the stain technique.
Kev
-
Looking good . How does the cutaway affect the string access? Its more than likly okay but you would not want to go too deep. How does it feel with a bit of air guitar??
-
I have had some productive time lately , here is what I have got done.
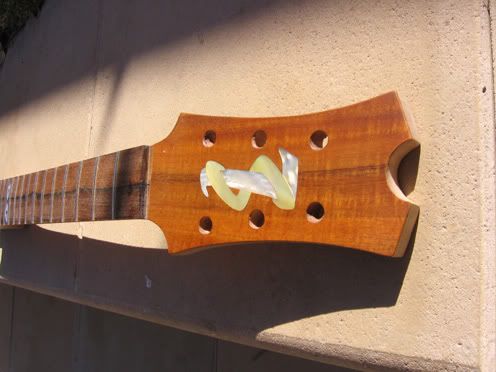
First I designed a headstock logo which I drew on paper. Its an S wraped around a T,as I call the few guitars that I have built Thirdstone as a make beleive brand. I hope there,s not a real thirdstone out there.
Once drawn out its then cut up into seperate pieces so I can glue them to the bits of MOP. Then I cut out the MOP and shape to fit. Its then layed down on some adhesive tape face down . I then mix up some apoxy coloured with some sawdust from the headstock.This is layed over the back of the design and allowed to cure. Once cured carefully peel off the tape and you have this
Also I did some more work on the headstock fitting a blackwood venir and drilling the machine head holes.
headstock with test fitting of machine heads and inlay
http://i52.photobucket.com/albums/g32/Thir...nlayresting.jpg
back of headstock
http://i52.photobucket.com/albums/g32/Thir...eartrialfit.jpg
Next is to inlay the MOP.
-
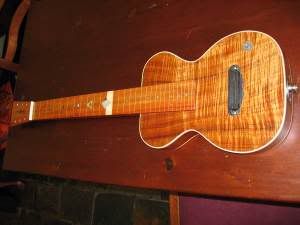
More progress. I have spent some more time refining the back of the neck. Its close to what I am aiming for. i still have some more work to do on the volute. At the moment its a bit ugly. I needed some time away from the neck so I decided to rough cut the body shape. I left a bit of wood around the lower horn cutout for protection whilst the neck is comeing and going. I plan to reduce it quite a bit just before the gluing of the neck. Just after its glued I will finnish off the cutaway.
Overview from the neck
http://i52.photobucket.com/albums/g32/Thir...iewroughcut.jpg
from above
http://i52.photobucket.com/albums/g32/Thir...opviewrough.jpg
lower cutout
http://i52.photobucket.com/albums/g32/Thir...nlowerrough.jpg
neck join from the back
http://i52.photobucket.com/albums/g32/Thir...ckjoinrough.jpg
Next is to put the templet on the body and use the router to clean up the body.
-
Very nice finnish .
Also what neck are you using??
Is the shape a bit blown out at the lower rear or is that the photo?
I agree with skibum that wood is much more interesting than the too purfect quilt that you see.
Thanks
-
I have started the shaping of the neck, Its going well but I must say this is one of the stages where you add a bit of personality to the work. The neck shape makes a huge differance to the pleasure of playing a guitar.
I tend to remember guitars as much for the feel of the neck as anything else.
Let me see, A pretty cool black 50's strat with an almost baseball bat boat neck, the big Jeff Beck neck. is it me or have the JB necks reduced in size over the years.The almost mesmarising Earnie Ball EVH asymetric oiled job. The early Fender Clapton V , My Fav Fender neck shape very nice. The Fender soft V is also good. I played a Music Man custom job once that also had a very good oiled slim neck that just begged to be shredded on. Speaking of shredding, sorry not a fan of Ibanez JEM necks or the super thin ones, Wizard necks I think they are called.
Necks I have made in the past have ranged from a thick C (the first one ) to a hard V but I have settled on some thing that has a medium V at the nut which fades into a C around the 5th fret with a 12" radius fretboard.
Neck width is 46.5mm( should come down 1mm, still big though.Normal is 42-44mm) at the first fret to 53mm at the 12th fret. Neck thickness is about 21.75mm at 1st fret
to 24.5mm at 12, this will reduce .5 to 1mm . I might also firm up the V a bit.
If you want to get some neck dimentions go to the Warmoth site http://www.warmoth.com/guitar/necks/necks....n=back_profiles for some good reading.
A bit hard to make out but this is the progress
http://i52.photobucket.com/albums/g32/Thir.../neckcarve1.jpg
http://i52.photobucket.com/albums/g32/Thir...90/IMG_0315.jpg
-
If you look at sales of old Gibson SG`s and Les Pauls you will read many mentions of "slight crack", "Repair carried out" , "sign of crack " ect,ect. Particulary SG`s. There is no doubt that Mahogany headstocks attached to electric guitars suffer more than say Maple necks when there is an accident. I am just trying to lessen the chance of damage down the track . The Volute looks big now but when finnished it will be reduced somewhat. Whether it will make a differance I will never know .The only thing I do know is that if the headstock were to get damaged with out one It will be too late to add a volute and I would be left wondering what if!!!!
Interesting to note is that PRS guitars are holding up well in this area
Could that be that young accident prone (read drunk) people can't afford them in the first place?
Cheers
-
I like the strat its cool. Some closer photos please. Is the paint flat to the body or is it lumpy??
-
Some progress on the neck . I have a bit of a problem with headstocks .I find them very hard to design,to get something halfway original and still be functional with the design requirements. Its the only time I wish I had access to a CNC. Anyway the problem I noticed with mahogany headstocks is that they are prone to break behind the nut. I have done my best to keep this part of the neck strong by keeping the trussrod adjustment away from the nut and i have added a volute to add a bit of meat to the area. I have no idea how you make one but this is what i have come up with.
The headstock design
http://i52.photobucket.com/albums/g32/Thir...ock-drawing.jpg
the volute started
http://i52.photobucket.com/albums/g32/Thir...lute-thined.jpg
cleaned up a bit
http://i52.photobucket.com/albums/g32/Thir...olute-rough.jpg
side on
http://i52.photobucket.com/albums/g32/Thir...ute-side-on.jpg
I desided to have a thickish neck aroun 22mm at the first fret and 24mm at the 12th. I have gone to the thicker side of things as If it feels too thick I can thin it down later. can't add wood!
http://i52.photobucket.com/albums/g32/Thir...neck-cutout.jpg
Next is to finish up the headstock and volute and start the shaping of the neck. I could fret it first but it realy dosn't make much differance.
I have to decide if I want a headstock vineer which i think I will. proberbly blackwood. I would also like some sort of headstock name (thirdstone) in MOP. That will take time as I should have sorted that out earlier. I could use a water slide decal but if you are going to all the effort of making a guitar that will be around to hand over to your children its not much more to do.
-
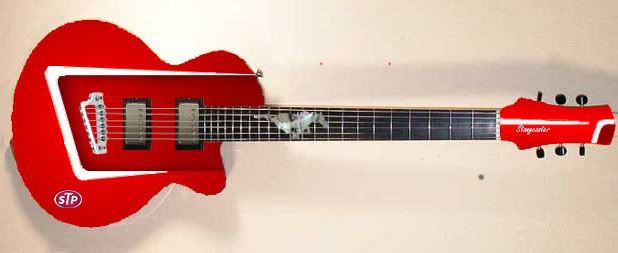
Hi mate, I did a bit of quick photoshop work This is sort of what I ment. The headlight shade bit on the headstock would be releived a bit for 3D affect , say 2mm. The name says stangcaster but whatever!!
[
-
Looking good .I like the concept very much.Stick with the first design, The Humbucker are better than the P90 as they add a bit of chrome to the look. Have you thought of adding the headlight curve to the headstock?
The design uses the baby grande to good effect.I have been wanting to use that bridge for a while but have not found the right project. The mustang inlay is cool, I would have used that and no other position markers. If you realy wanted position markers how about mini horse shoes.!
How about an STP sticker for retro effect or the double checkered flag emblem.
More pics please..
-
looking beautiful! I really like the wheel adjuster for the rod at the end of the fretboard. That'll make a big difference in the strength at the headstock and it's a handy place for adjustment.
How long was the truss rod you used? Does it start at the fb edge of the nut or further down? what fret does the wheel come out at.
Thanks,
Brian.
The trussrod is a stew mac hotrod http://www.stewmac.com/shop/Truss_rods/Hot...Truss_Rods.html
It starts just bridge side of the nut and the adjustment is pup side of the 22nd fret. Sorry I can`t remember the length but that should give you an idea. I have used these rods before and so long as they are tight in the slot they are fine. You can improve the fit slightly by using a rounded router bit rather than a flat bottom straight cut bit.
-
Some more progress. Its going well
here is a shot of the fretbord gluing. Never enough clamps.
http://i52.photobucket.com/albums/g32/Thir...ng-fretbord.jpg
Next was to inlay the dots. At first I wasn’t going to put dots on (Except for the 12th fret) as I wanted a minimalist approach. I will still have side dots as that’s what I find I look at most. I compromised by using black MOP dots which are not completely black, more silver.
I then wanted a small inlay at the 12th fret position inlay so I designed some frowning eyes looking out from the board. The eyes are white MOP paua MOP and black MOP. It turned out good I think.
http://i52.photobucket.com/albums/g32/Thir...dots-insert.jpg
Cleaned up a bit with 12inch radius
http://i52.photobucket.com/albums/g32/Thir...with-radius.jpg
Cutting out the neck
http://i52.photobucket.com/albums/g32/Thir...ng-out-neck.jpg
I then trimed the tennon adding a 2 degree angle to the bottom of the tennon.
http://i52.photobucket.com/albums/g32/Thir...-neck-tenon.jpg
I spent a bit of time making and testing neck socket jigs so that I would get a tight fit. No room for error.
Neck tennon shortened and fitted into the newly routed neck slot.
I actualy routed the neck slot first then the PUP route. Next time I will route the PUP first as it allows you to see where the PUP route depth stops and gives you a better idea where you are when doing the neck route.
.
http://i52.photobucket.com/albums/g32/Thir...k-pup-fit-1.jpg
Test fit nice and tight. Zero movement.
http://i52.photobucket.com/albums/g32/Thir...ck-fit-test.jpg
Coming together
http://i52.photobucket.com/albums/g32/Thir...ng-together.jpg
Headstock design next but first some wings.
http://i52.photobucket.com/albums/g32/Thir...luing-wings.jpg
Thats all for now gotta go and design a headstock...
-
are you going to be doing a bolt on, or how are you going to leave the adjustment for the truss at the bottom of the neck?
It will be a set neck with the wheel style adjuster accessible from in front of the neck pup.
-
Did you plane that headstock angle by hand?...looking good.
Th bulk of the wood was removed with a bandsaw and then it was cleaned up with a plane..
I am aware of the weaknesses of this design so I plan to have a Volute and also I kept the trussrod adjustment at the body end. This avoids the need to remove wood at the nut headstock area keeping max strength...Thanks for the comments.

Quick Q On Oil Finish On Oil Stain
in Inlays and Finishing Chat
Posted
Can anyone advise me on this. I am planing to sand seal mahogany with an oil based sealer the put down a oil based tint then do a danish oil finish. Any problems with the danish oil pulling out the tint???
Thanks in advance..Kev